By Gallina Mackenzie. Published on Egyptological, Journal Articles, Journal Edition 5. on August 14th 2012
Abstract

Faience manufactured by the author
Ancient faience material found in large quantities throughout Egypt display a wide variety in the quality and intricacy of workmanship. Although evidence has shown that that there were temple and royal workshops the amount of pieces discovered in and around domestic dwellings suggest a thriving cottage industry existed. This paper investigates this possibility through experiments to recreate the traditional conditions and the processes used in the manufacture of faience. A wood fired kiln based on the traditional Ancient Egyptian bread oven was used with electric fired control pieces produced in order to trial recipes and develop an understanding the role of temperature in the nitrification process. The experimentation explored the processes of application, efflorescence and cementation and the techniques of moulding, bead making, inlay and stone glazing.
Introduction
The impetus for this dissertation came from a lecture by Dr Mark Eccleston (2011) in which he described an experiment he conducted at the Amarna excavation site to create faience under less controlled conditions than those produced under laboratory conditions. Although evidence has shown faience was made within royal and temple workshop complexes, he suggested that there was also a thriving cottage industry. Shortland, Nicholson & Jackson (2002 p.158) believe that a busy market in faience supplied by private workshops was operating in Amarna.
This paper investigates the production of faience in a practical manner by using the ancient methods and using a wood fired oven, having established the properties and behavior of the material by researching the current laboratory evidence prior to the practical experimentation.
1. The Development and Processes of Fiance Production
1.1 What is faience?
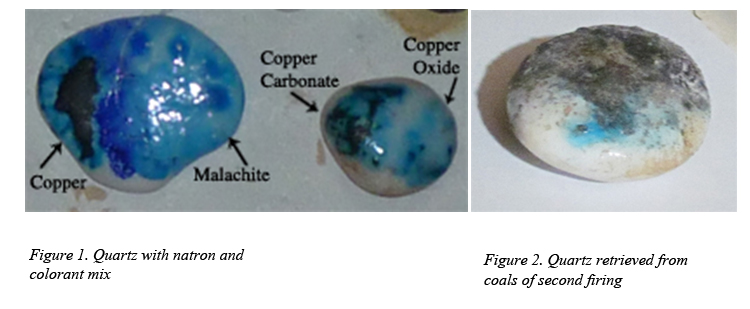
Faience is a vitreous material i.e. it is more like glass in its structure than ceramic. In Ancient times it was known as THnt and was used to represent both faience and glass. Unlike the general form of ceramic faience contains no clay but has a silica base derived from crushed quartz or sand. Nicholson, (2009, p.1) Lucas (1948, p.197-8) believed that it stemmed from a serendipitous heating of grinding stones used to powder malachite, and a mix of natron or plant ash resulting in a beautiful blue/green glaze that gave the appearance a precious jewel.
As a starting point for my experimentation I decided to test this hypothesis using a sodium mix based on natron analysis, and with the grinding stones replaced by quartz pebbles. Natron was a naturally occurring evaporative deposit consisting of a mix of sodium carbonate, chloride and sulphate. It is found throughout Egypt and used as an alkali in the making of vitreous materials, soap and a drying agent for mummification.
- 3gms sodium chloride (common salt)
- 2gms sodium sulphate
- 1gms sodium carbonate,
- 1gms sodium bicarbonate
- 1gms silica (Noble, 1969 p.436)
Equal quantities of natron and colorant were mixed and sprinkled dry on a piece of quartz and fired at 850˚C in the electric kiln. Raw copper powder, malachite powder, copper oxide, copper carbonate and cobalt were used. This worked beautifully in the kiln but unfortunately it was among pieces fell into the fire in the second firing. Despite this, a small portion retained the glaze. It could be easily imagined how magical it must have been to see a stone like this emerge from the fire (figures 1 and 2).
1.2. Ancient Production Processes.
Although examples of faience have been found from the earliest excavations, the variety of processes of production have only been understood relatively recently. Originally the only form of faience was thought to be application (see below), however work studies of faience using SEM (scanning electron microscope) technology and experimentation using electric kilns has demonstrated that three distinct methods were used. (Nicholson & Peltenburg, 2000, p177)
a. Application
This is considered to be the earliest form of glazing in Egypt. Petrie (1910, p.107) described it as glazed pottery. Although he understood that the body was silica instead of clay, he based his description on known contemporary pottery techniques in which a shaped body was coated with a glaze mix and fired. Lucas (1948, p.179 – 192) also believed that this was the only technique used, but extended it to classify the process into six variants based on the different colours and the appearance of the internal structure.
b. Efflorescence
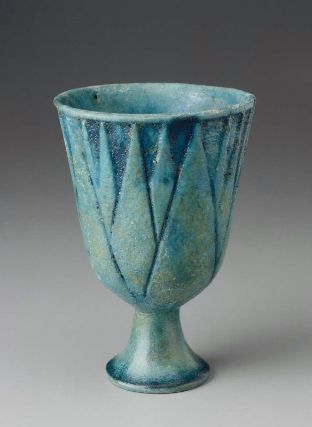
Figure 3. Faience Blue Lotus Chalice. Tomb D115, Abydos New Kingdom H.14cm D. 11cm. Copyright Boston Museum of Fine Arts
A self-glazing mixture in which the main body of silica (either as sand or crushed quartz) is combined with a form of soluble salts either from natron or plant ash (an alkali), crushed lime stone (calcium carbonate) and a metal oxide, usually copper, as a colorant. The ingredients are mixed with water to a stiff consistency, formed and left to dry. As the water evaporates the salts carrying the colorant, migrate to the surface (known as wicking) to form a crust that fuses during firing and creates the glaze. (Nicholson, 1998, p52)
At times a combination of these two techniques were used. In the example of a blue lotus chalice from an Abydos tomb (figure 3), the chalice was constructed first and, when dry, the design was incised on the surface. As the crust would have been removed during this process it was then dipped in a slurry of a finer grained efflorescence mix. (Vandiver & Kingery, 1992, p.82)
c. Cementation
This is also known as the Qom technique and is still used in Iran and first documented by Wulff and Koch in 1968 (Nicholson, 2009, p.6). The pieces were made of a mix of fine ground quartz, a binder, possibly gum acacia, and plant ash. The mixture is dried then packed in a container in a mixture of plant ash, hydrated lime, powdered quartz, copper oxide and charcoal. After firing, the powder can be easily crumbled away leaving the glazed object clean and free of work marks. Investigations by Tite, Freestone and Bimson (1983, p 17- 27) comparing ancient artifacts and laboratory replicas show how this was used in Ancient Egypt.
The temperature required for cementation was approximately 1000˚C (Matin & Matin, 2012, p767) and although I did trial it in the electric kiln, and achieved a coloured coating, the mixture did not vitrify successfully and crumbled easily. As I was not sure that I could reach an adequate temperature in the wood fire I decided not to experiment further.
2. The Experiment
As a control I decided to fire replica pieces in an electric kiln using a firing schedule based on Eccleston’s first firing schedule (2008, p 34). As the experiment progressed this was expanded in order to trial the different mixes, processes and firing temperatures. This was done to improve my understanding of the reaction of the materials to the processes and assist with decisions regarding the composition of the pieces chosen for the wood firing.
2.2 Raw materials and Recipes
The use of the SEM has enabled the identification of the individual ingredients and facilitated successful replication of the artifacts using electric or gas kilns. The published works of Tite, Freestone and Bimson (1983), Tite and Bimson (1989), Shortland (2006), Tite, Manti and Shortland (2007), compare ancient artifacts with those reproduced in the laboratory. Although they give a comprehensive breakdown of the ingredients and the resulting reaction within the body of the faience under a variety of controlled conditions, the recipes are given as chemical components of a formula and include trace elements. Some of these I was not able to access. As my focus was to gain a better understanding of the practical aspects in making faience and Nicholson (2009, p.2) points out the ancient craftsmen were not chemists and a wide variety of faience compositions have been identified, I began with recipes used by and Eccleston (2008, p.33) (figure 4) and Noble (1969, pp436 & 438) (figure 6). These gave ingredients that I was able to access readily.
| Eccleston variations. | ||||||
| Ingredients in grams | E1 | E2 | E3 | E4 | E5 | E7 Tile body |
| Quartz (Silica fine sand) | 65 | 35 | ||||
| Quartz (Silica powder) | 65 | 70 | 35 | |||
| Recycled Quartz (Crushed pebbles) |
70 Fine |
80 Coarse |
||||
| Ball clay | 10 | 10 | ||||
| Gum Acacia | 5 | 5 | 5 | 5 | 5 | 5 |
| Soda Ash (Sodium carbonate) | 13 | 13 | 13 | 13 | 13 | 10 |
| Calcium carbonate (Limestone) | 4 | 4 | 4 | 4 | 4 | |
| Copper oxide | 4 | 4 | 4 | 4 | ||
| Copper carbonate | 4 | 4 | 4 | 4 | ||
| Crushed Malachite | 4 | 4 | 4 | |||
| Copper | 4 | 4 | 4 | |||
| Cobalt | 4 | |||||
Figure 4. Recipes based on Eccleston’s Experiment (2008, p.33)
E1: – Base recipe as given by Eccleston (2007, p33) the clay was added to make the mix more workable.
E7: – Although Eccleston gave the ingredients, he did not mention the proportions so this was an estimate.

Figure 5. Colour variations in the copper based colorants
E3 & E4: – were mixed without a colorant. The individual colorants (a, b, c, d or e) were added proportionally when adding water. Although the first four are copper based, when used in the same proportion they gave different results. The copper carbonate and malachite were deeper in colour and had more of a green tint than the oxide and copper (figure 5).
Recycled Quartz: – The pebbles used on the base plate from the first wood firing were crushed using a stone mortar and pestle. Although time consuming, they crushed easily. Through sieving I was able to separate a very fine grade that I used in E3. The coarser mix was used for the tile bases E7.
Malachite: – I purchased a small piece of crystalline malachite. This was easily reduced to a very fine powder with the mortar and pestle.
Copper: – This was a piece of oxidized copper flake that by pounding and grinding was reduced to a fine powder.
| NOBLE | |||||
| Ingredients in grams | N1 | N2 Semi glass |
N3 Glaze |
N4 | N6 Steatite Glaze |
| Powdered Flint | 20 | 20 | 30 | 35 | |
| Feldspar Soda | 40 | 35 | |||
| Feldspar Potash | 40 | ||||
| Fine sand | 8 | 8 | |||
| Soda ash (Sodium carbonate) | 6 | 3 | 35 | 6 | 40 |
| Bicarbonate soda (Sodium bicarbonate) | 6 | 3 | 35 | 6 | 40 |
| Calcium Carbonate (Whiting) | 5 | 5 | |||
| Bentonite | 2 | 2 | |||
| Kaolin (ball clay) | 4 | 14 | |||
| Gum acacia * | 18 | 5 | 26 | ||
| Copper oxide | 3 | 1.5 | 7 | 10 | |
| Copper carbonate | 2 | ||||
Figure 6. Noble’s Recipes (Noble, P436-438)
* I substituted the gum for an ingredient that Noble recipe called dextine. I was unable to find what this was but did find a product called dextrin which is a starch based water soluble adhesive made from corn and has been used as a substitute for gum acacia (http://dictionary.reference.com/browse/dextrin)
N4: – Noble (1969, p436) gave his recipe stating only feldspar. I originally chose to use the soda feldspar because of the sodium content. As the initial experiments were unsuccessful, I investigated further and found that the analysis of many ancient faience articles contained levels of potash. It is believed that this came from the use of plant ash rather than natron. (Tite, Shortland, Maniatis, Kavoussanaki, & Harris, 2006, p1284-5) Based on this I changed to potash feldspar, which successfully produce a glaze surface in the later firing.
2.2. The Process
a. Mixing
The recipes were made up as dry mixes, water was added until the mix was of a consistency that would hold it shape. It was very difficult to work: too dry and it would not stay together; too much water and it would not hold it shape and had almost a jelly-like feel to it. I finally found that treating it as though making pasta dough was the most effective. Rubbing between the fingers tips while adding the water a drop at a time, then squeezing and rolling with the palm of the hand while moistening with wet fingers was the best method. A scene in the tomb of Ibi, the only known image of faience production to date (Nicholson 1998 p56), demonstrates this well. A seated figure sits with a flat, shallow bowl in front of him, reaching out to touch a mound of material in the bowl with both hands. A flat shallow bowl is what I found was the most effective to use as it helped keep the mix together. The other figure in the scene, who is working on a more complete piece, appears to have water dripping from the object, possibly indicating he was shaping it wet.
b. Shaping
Shaping had to be done quickly because the mixture is thixotropic and can quickly becoming inflexible, causing cracking and flaking while working. (Nicholson 2007 p138) Although I found that moistening helped keep it malleable; care had to be taken as too much water made the whole form unstable. Shortland (2000, p97) suggests that damp cloth may have been used to keep the mix workable.
Variations in the recipes affected the way the material reacted to shaping. The coarser grained recipes E1, E3, E4, were easier to mould and held their shape, but did not take fine detail as well as the finer grade material. The E4 rolled out more thinly and it is this recipe that I used for the rings. (Figure 10) I found that a mixture of grades of the silica/sand (E5, N1, N2 and 3) worked the best. The finer grade I used for glazing. The ball clay made little difference with the small pieces I was working with but I would expect that it would be an advantage in large and more detailed work.
A range of different techniques and shaped pieces were attempted using variations of the efflorescent recipes.
i. Moulding
Kemp & Stevens (2010 pp 476) note many bisque fired clay moulds made from Nile silt were found at Amarna. Some were found with faience residue adhering to the inside some with matching amulets.
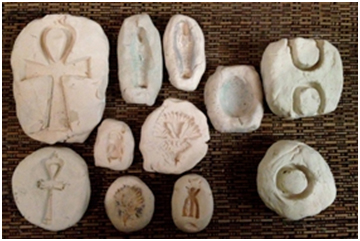
Figure 7 Moulds created by the author
I created a set of moulds by pressing some Egyptian souvenir articles into clay and bisque firing (figure 7). The mix was pressed into these and quickly removed. If it stayed in too long, or the consistency of the mix was too wet, it adhered to the mould and had to be scraped out. After several impressions the mould became clogged and would need to be cleaned before further use. Complex shapes and details did not impress clearly and extra shaping was done as soon as it was removed. Detail was added by inscribing into the surface with a wooden skewer. Although a range of shapes was attempted I found the scarabs were the most successful.
ii. Beads
Small beads were shaped around bamboo sticks and straws and left to burn out during the firing process. Some larger beads were rolled into a ball and a hole pierced through (figure 16).
iii. Tiles and Inlays.
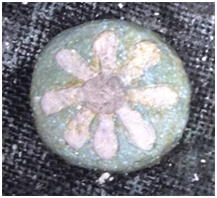
Figure 8. Inlay disc using E4 mixture. With copper carbonate disc, no colorant in the petals and cobalt centre.
Although initially I attempted to roll out flat pieces I found the mixture tended to stick and break off, it was more successful to press these with a flat piece of wood or my hand and use a piece of fabric underneath (figures 8 & 15)
Following the description of a possible technique given by Nicholson (1989, p.54) the inlay pieces were shaped and pressed flat and were either incised with a skewer or a tear shaped bead was impressed into the surface. The piece was then partially dried and the space was filled with a contrasting efflorescence mix (figure 8).
iv. Joined Forms
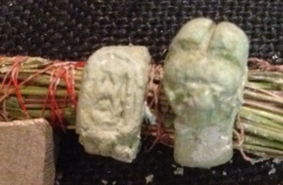
Figure 9. Rings
Larger and complex pieces such as the lotus chalice mentioned above (figure 3) had been made in separate sections, dried and joined using faience paste. (Nicholson, 1989, p.60) Using the E4 mix, I attempted to use the shank mould that I had made but found that I could not remove the mix successfully. Instead I rolled a thin strip of faience and laid it around a bundle of straw to dry. When dry enough to handle I added a moulded dried scarab form to one and a cartouche inscribed with the hieroglyph for Teti to the other, using a pasty mix of the same recipe (figure 9).
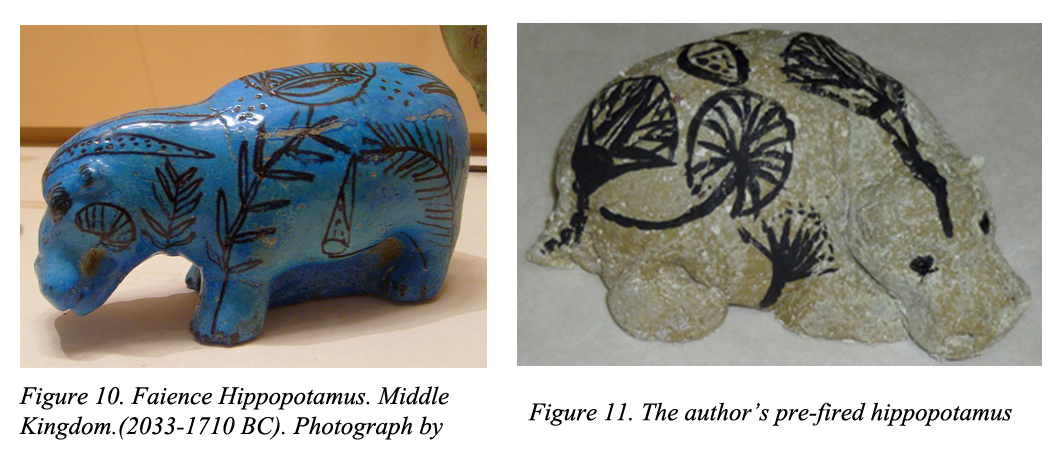
v. Sculptural forms.
Figurines such as the hippopotamus (figure 10) are believed to have been formed over straw core. (Nicholson, 1998 p. 58) Using this image as a guide and recipe mix E2, I attempted to make one over a ball of straw. Although I needed to continually moisten the surface, it was relatively easy to shape the body and legs. The head was more difficult as the features tended to slump. When dry, I painted the surface with lotus flowers and leaves using manganese dioxide and water. (Figure 11).
vi. Glazed Stone
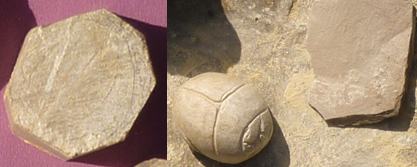
Figure 12. Steatite blank and shaped scarab with slate on shaping rock
The earliest faience glazed stones found were numerous steatite beads made in during the Badarian era. (Patch 1989 p177) Also known as talc stone, steatite is very soft and easily shaped. When glazed and fired the hardness of the stone increases, which made it a useful material for a variety of forms. (Noble, 1969, p.438)
Although I initially cut the steatite with a contemporary saw into small slabs I was able to create a scarab shape easily by abrading it on a rock and incising the surface with the edge of a piece of slate. (Figure 12)
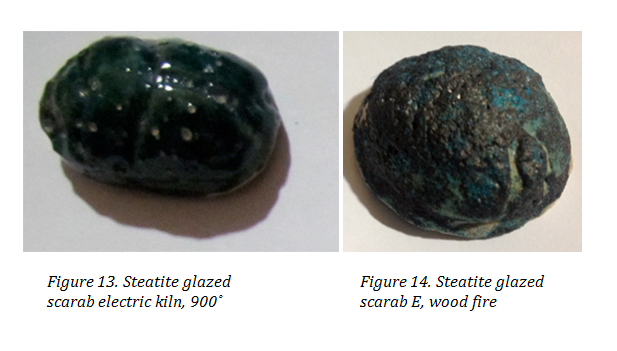
Using recipe N6 I trialed this in the electric kiln with temperatures ranging between 800˚- 900˚C with successful results that producing a green glaze. (Figure 13) However it was unsuccessful in the wood firing as the surface glaze had appeared to have shrunk and “crept” on the surface (figure 14) indicating that the temperature was too high.
c. Drying
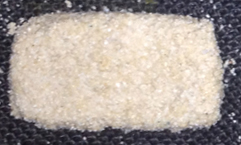
Figure 15. Tile using E7 mixture drying on fabric
A number of fabric impressed plaster tray pieces have been discovered in the workshops of Amarna. These are believed to have been used as drying trays and to help draw the moisture from the pieces. (Nicholson, 2007, p.139) I used plaster trays that I had made but found that the pieces adhered to the surface while drying. This was overcome by placing a piece of fabric over the tray. I also found that using a piece of fabric under larger pieces prevented sticking to the work surface and allowed me move them without damage. I was able to remove it easily from the efflorescence pieces easily but the application tiles with the pure silica body were very friable so the fabric was left to burn out during the firing.
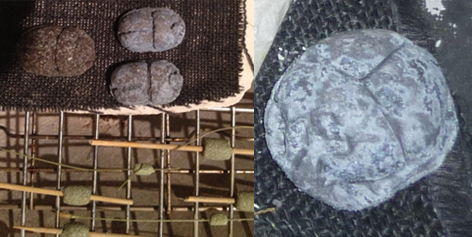
Figure 16. Drying plate and rack in electric frypan with scarab showing efflorescence layer
As experiments have shown, the faster the drying time, the thicker the layer of salts that migrate to the surface. (Nicholson 1998 p.53) In order to facilitate this a metal rack and plaster tray were placed within a lidded electric frying pan that was kept around 40˚C. It has also been shown that the migration appears where the piece is exposed to the air, little or no migration occurs on the base. (Nicholson 2007 p137) Therefore the beads were placed on a rack in order that no surface was touching during the drying period (figure 15). A salt crust was visible on the surface within twenty to thirty minutes and the samples were left to dry overnight before firing (figure 16) N1, N2 and E4 recipes wicked out faster and thicker than the others and Noble suggests that it is the result of using a mix of sodium both of which are present in natron. (Noble 1969, p.436)
e. Firing Preparation
Eccleston’s oven (2008, p34) (figure 17) was a mud brick replica for a bread-making experiment. (Samuel,1989, pp. 253-290) Due to our unpredictable weather conditions I was concerned that the mud bricks would dissolve before the experiment could be concluded so I used refractory bricks. The construction was based on oven remains documented by Nicholson and Hart (2007, p33-9) found at site 045.1 Amarna and Samuel’s (1989, p. 244) description. My oven dimensions were:- height 45 cm, interior diameter 44 cm, wall thickness 12cm with an 18 x 20 cm opening for the stoke hole at the base. As noted by Eccleston (2008, p.33) there were no shelves found in the ancient ovens, so several fire bricks were placed inside to create a support for bisque fired clay shelf. Following Eccleston’s procedure, a layer of quartz pebbles was placed first to prevent sticking to the plate. (Eccleston, 2007 p33) An inverted terracotta bowl was used to protect the pieces from ash (figure 18).

2.3. The First Wood Firing
a. The firing
The first pieces to be fired were a mixture of pieces made of Recipes M1, M2 and N1 and included several inlay pieces (figure 20). The thermocouple probe inserted to sit within the space and the bowl, raised a centimetre was placed over the work. The temperature within this space was checked every five minutes throughout the firing and recorded (figure 19).
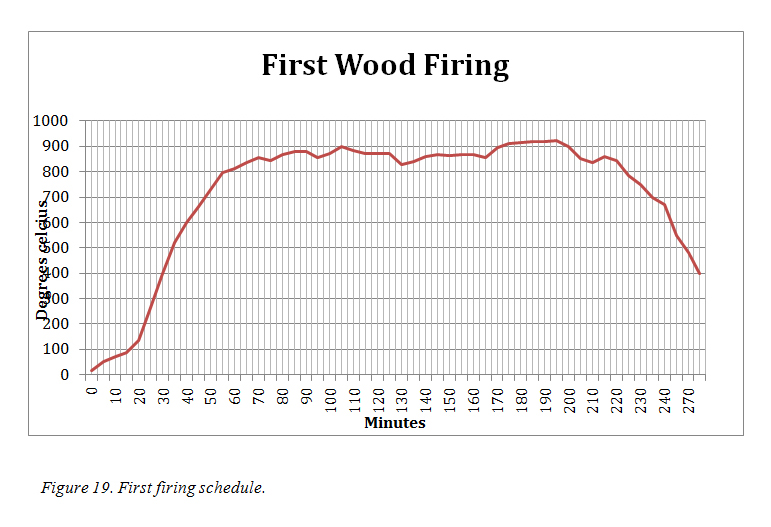
The fire beneath was started with palm fronds then wattle and gum were added. The fuel used for the firing was a mixture of these two woods predominately red gum as that was readily available in my area. As Eccleston had overcome the difficulty that he had in raising the temperature by lighting a fire on top of the kiln, (Eccleston, 2007. p34) I laid wood across the top of the oven once the base fire had been established. This caught approximately 30 minutes into the firing and the temperature rose steadily over the next half hour to reach the targeted 800°C. It continued to rise gently over the next hour and fluctuations in temperature coincided with my stoking the fire and the changing wind direction and strength. At approximately 2hours 45mins the wind increased in strength and was blowing directly into the stoke hole and the fire increased the temperature rising to 940 deg over the next 30 minutes. At this stage I decided to finish and not add any more wood and left the fire to burn out. It took approximately 4 hours before the temperature cooled enough (to 100˚) to remove the ash and lift the cover.
b. The Result
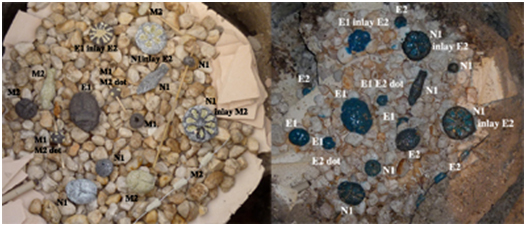
Figure 20. Pre and post first wood firing
When the bowl was removed, vitrification of the all the pieces had occurred. (Figure. 23) Some of the surfaces did not have the smooth and even coloured finish I had expected and were matt and pitted in places. The glossy pieces had darker blue flecks across the surface that appeared as undissolved colour pigment. However this was similar to the Eccleston image (figure 21) All of the pieces made from E1and E2 were covered in a bright blue and glossy surface. The pieces made from the N recipes did not have the same colour or glaze quality as the E pieces. The N1 pieces near the right edge of the kiln box had a green/black metallic finish to the surface. I suspect that the temperature on this side was higher than recorded and would account for the different results from the same material. Unfortunately the pieces had also fused to the surface of the pebbles and in some cases slumped into the spaces. Explosion of some stones had moved some of the pieces.
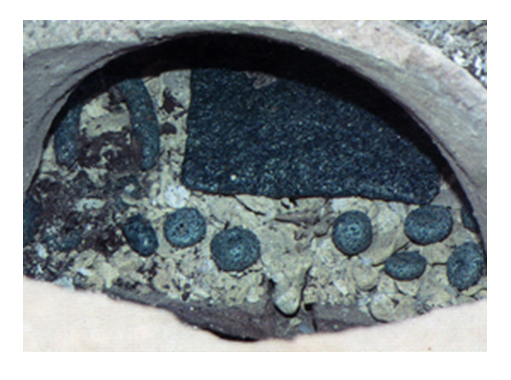
Figure 21, Eccleston’s first firing result (2007. p34)
The details incised into the surfaces of E1& 2 had almost disappeared.
There were also considerable differences between the different pieces internally (figure 22)
NI. This had a light grey centre with a darker grey at the edge of the base. It had flecks of interparticle blue glass throughout the body. A thin layer of blue/green surrounded the whole piece. This piece had an inlay of E2 that had a very thin turquoise glassy layer on the surface and lighter blue underneath. It had vitrified right through. It appears to have been become very fluid during the firing, as it overflowed and ran beneath the piece and became fused to the quartz that it was resting on.
N2. This also had a light grey centre with a grainy texture with the interparticle glass scattered through and a thin layer of blue on the surface. The texture was softer than the earlier piece and crumbled if scratched. The surface had flaked and some of the blue could also be scratched off with a fingernail.
E1. The whole piece had vitrified with a honeycomb like appearance. The centre was tan surrounded by a very thin layer of a sandy colour, followed by a wider blue/green layer that appeared finer in texture than the body.This indicates that there was a higher amount of interparticle glass within this layer. The surface was hard and glossy, turquoise with a slight green tinge.
E2. This piece had also totally vitrified with a glossy surface, as with the previous piece. The internal body was much finer in texture and the interparticle glass was throughout the body.
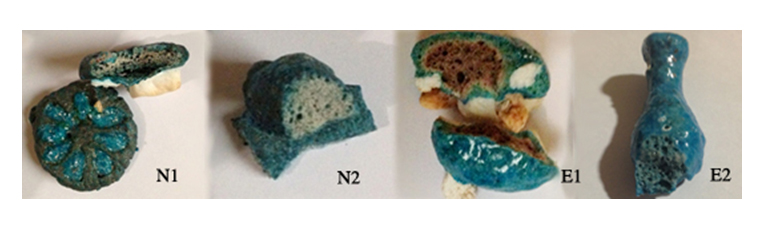
Figure 22. Cross section of a representation of each of the recipes used in the firing
2. 4. Electric Firing

Figure 23. Hippopotamus model after firing with insert of pre fired model
A replica set of pieces was fired in the electric kiln following a similar pattern to the wood fire and holding at 900˚C for an hour. The results were similar and the cross sections matched those of the wood firing. This firing included the model of the hippopotamus. Although this appeared to be a simple piece I had to make several attempts at construction without it cracking or collapsing. When it was finally dry and painted I was very happy with the result. It vitrified successfully, however it had slumped, lost some of the modelling detail and the painted decoration had dissolved into the surface. I was so disappointed and could well imagine how the ancient craftsman must have felt when an intricate piece that he had spent so much time and care on was damaged in the final firing process.
Most of the painted decoration had dissolved into the surface (figure 23).
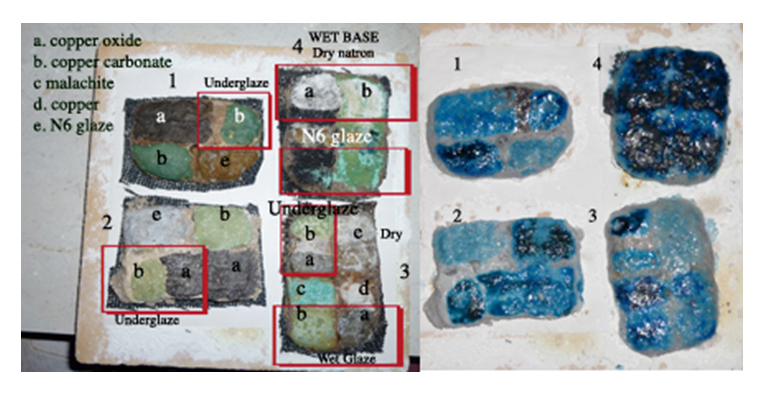
Figure 24. Pre- and Post-fired tiles
Using the E5 recipe I made a set of four tiles and applied a using a variety of colorant mixes. Three of them were successfully fired at 900˚(figure 24) producing a strong base. The fourth, a wet tile onto which natron and colorant were applied, appeared to have over fired, as the resultant glaze displayed a metallic dark finish similar to the Noble pieces in the wood firing.
In order to establish the effects of temperature of the firing, five scarabs were moulded using the E4 mix and copper carbonate as the colorant. They were each fired to a temperature from 750˚ to 900˚(figure 25). At 750˚ the scarab surface was matt and showed blue with black flecks. As the temperature increased, the glaze developed, the black disappeared and the detail slumped into the surface. Internally the light grey grainy texture developed to full vitrification and was blue throughout.
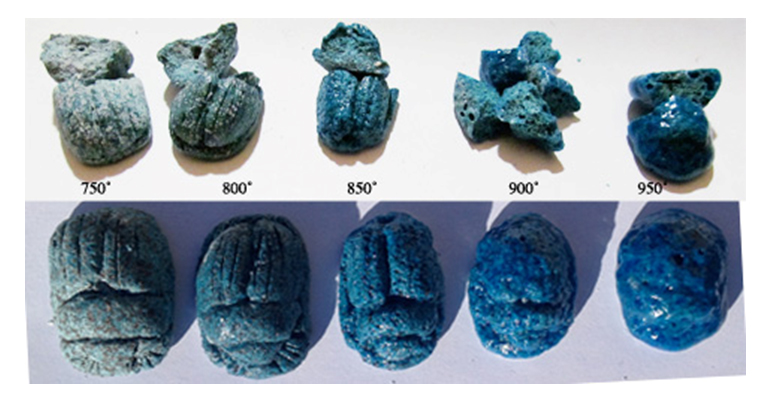
Figure 25. Temperature test
2.5. Second Wood Firing
a. Firing
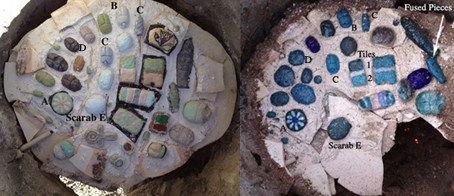
Figure 26 Pre- and post- final wood firing
The oven was set up in the same manner as the first firing. However instead of using quartz pebbles, a thick layer of hydrated lime was spread over the base (figure 26). This was suggested by Nicholson, (2009, p7) as method that to prevent sticking. A fire was set both below and above the covered work. My aim was to maintain a temperature over 850˚C but below 900˚C for an hour to replicate the firing in the electric kiln. The temperature rose quickly and within the first 5 minutes had reached 100°C. Unfortunately at this point the thermocouple malfunctioned. I decided that as the Egyptians did not have the benefits of temperature measurement devices I would continue with the experiments and use my judgment as to the heat. I followed the same pattern of adding wood and stoking as I had for the first firing. As this had reached 800˚C in approximately an hour I maintained the fire for a two and a half hour period then stopped adding wood.
b. Result
Vitrification had taken place and most of the pieces had glazed successfully (figure 25). Unfortunately the base plate had broken resulting in several of the pieces moving and fusing together and some falling into the fire. Pieces had slumped and incised detail was lost, indicating that the temperature had been uneven within the chamber. Areas most affected were at the edges of the bowl and around the space where the plate had collapsed.
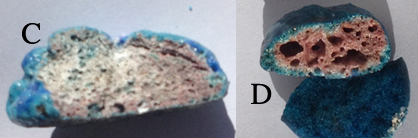
Figure 27. Comparison showing variation of temperature in wood firing
The change to potash feldspar for the Noble recipe was successful displaying even glaze (Figure 25. Pieces, B) The E1&2 recipes pieces exhibited the same surface and core results as the first firing. The removal of clay appeared to have no discernable difference as the E3, 4 & 5 recipes as the result was similar to the E2 recipe. The tiles in the centre using malachite 1, copper 2, in a thinned E4 recipe fired successfully.
Core examination across the plate revealed a variety of differences of vitrification. By comparing the samples with the known temperatures from the electric kiln experiments I was able to ascertain the heat differences within the cover. Figure 29 shows the core of scarabs labelled c and D in Figure 27. The centre is a similar to the piece fired at 800˚ while the scarab marked D indicates the temperature was above 900˚.
Conclusion
James (1984. p 265) points out that bartered services and excess home produced goods supplemented household income. The basic materials of the most common blue faience (sand and an alkali such as plant ash or natron) were readily available. Shortland, Nicholson & Jackson, (2002 p.154) suggest that as very little colourant (copper or bronze filings) was needed it could be obtained through barter probably from metal workshops. Pyrotechnical knowledge was well established and the evidence from Amarna suggests that it can be manufactured in a variety of different types of kiln and the methods would have been well understood. (Shortland, Nicholson & Jackson, 2002 p.154). They further point out that the large amount of small pieces found suggest a these were prevalent in the community and easily obtained. (p.156)The basic materials of faience were readily available and evidence has shown it can be manufactured in a variety of different types of kiln and the methods would have been well understood. (Shortland, Nicholson & Jackson, 2002 p.154)
Therefore it is feasible that faience could have been produced in basic home ovens as well as purpose built ones in workshops.
I began this experiment with no experience in the use of this material. The results and observations are based on a once-only test of each recipe variation and temperature. With repeated attempts, I would be able to refine skills and achieve improved and more consistent results. Although the results from the experiment were varied and I found each firing posed further questions and avenues for exploration, I was satisfied with the result. I believe that Ecleston’s (2011, lecture) and Shortland, Nicholson & Jackson’s (2002 p.156) proposal of privately organised production was plausible.
Image Credits
Unless otherwise stated, all photographs are copyright of Gallina Mackenzie:
Figure 3, Goblet in the form of a blue lotus, Copyright Boston Museum of Fine Arts, used under conditions of Fair Usage (http://www.mfa.org/about/terms-of-use)
Figure 10, Blue hippo with decorations of aquatic plants. Made of faience with blue glaze. Middle Kingdom.(2033-1710 BC). By SiefkinDR. This file is licensed under the Creative Commons Attribution-Share Alike 3.0 Unported license. Sourced via Wikimedia.
Figure 17, Mark Eccleston’s oven. Copyright Mark Eccleston. Used with permission.
Figure 21, Mark Eccleston’s first firing results. Copyright Mark Eccleston. Used with permission.
Bibliography
Eccleston, M, 2008. ‘Replicating Faience in a Bread Oven at Amarna.’ Egyptian Archaeology vol. 32, pp. 33–5
James. T.G.H. 2007, Pharaoh’s People 4th Edition,Tauris Park Paperbacks, new York.
Kemp, B. and A. Stevens, 2010. Busy Lives at Amarna: Excavations in the Main City (Grid 12 and the House of Ranefer, N49.18). Volume II: The Objects. EES Excavation Memoir 91, London: Egypt Exploration Society and Amarna Trust.
Lucas, A. 1948, Ancient Egyptian Materials and Industries. 3rd edition, London: Edward Arnold& Co.
Matin, M. & Matin, M. 2012. ‘Egyptian faience glazing by the cementation method part 1: an investigation of the glazing powder composition and glazing mechanism.’ Journal of Archaeological Science 39 pp. 763-776
Nicholson, Paul T,1998, ‘Materials and Technology.’ in Friedmann, Florence Dunn, (ed.), Gifts of the Nile: Ancient Egyptian Faience Thames and Hudson and the RISD Museum pp. 50- 64
Nicholson, P.T & Peltenburg E. 2000, ‘Egyptian Faience in Nicholson.’ P.T. & Shaw, I.M.E. (Eds.) Ancient Egyptian Materials and Technology. Cambridge: Cambridge University Press. pp.177 -194.
Nicholson, Paul T. 2007, Brilliant things for Akhenaten: The production of glass, vitreous materials and pottery at Amarna Site 045.1. Egypt Exploration Society Excavation Memoirs 80. London: Egypt Exploration Society. CD.
Nicholson, Paul T. & Hart,R. 2007, ‘Excavations at Site 045.1’ in Brilliant things for Akhenaten: The production of glass, vitreous materials and pottery at Amarna Site 045.1. Egypt Exploration Society Excavation Memoirs 80. London: Egypt Exploration Society.
Nicholson, Paul T, 2009, ‘Faience Technology.’ In Willeke Wendrich (ed.), UCLA Encyclopedia of Egyptology, Los Angeles. http://digital2.library.ucla.edu/viewItem.do?ark=21198/zz0017jtts
Noble, J.V, 1969 ‘The Technique of Egyptian Faïence.’. American Journal of Archaeology, Vol. 73, No. 4. pp. 435-439
Patch, D.C., 1998, ‘Illustration Notes.’ In Friedmann, Florence Dunn (ed.), Gifts of the Nile: Ancient Egyptian Faience Thames and Hudson and the RISD Museum p. 177
Petrie, Flinders, 1910, The Arts And Crafts Of Ancient Egypt. T. N. Foulis Edinburgh
Samuels, D. 1989 ‘Their staff of life: initial investigations on ancient Egyptian bread baking,’ in Amarna Reports V, Occasional Publications 6. Edited by B. J. Kemp, pp. 253-290. London: Egypt Exploration Society.
Shortland, Andrew. 2000 Vitreous materials at Amarna: The production of glass and faience in 18th Dynasty Egypt. British Archaeological Reports International Series 827. Oxford: Archaeopress.
Shortland, Nicholson & Jackson, 2002, ‘Glass and Faience at Amarna.’ in Shortland A.S. (ed) The social context of Technological Change. Egypt and the Near East, 1650 -1550 BC. Oxbow Books Oxford .pp. 46-160
Tite, M. S, Freestone I. C. & Bimson, M. 1983 ‘Egyptian Faience: An Investigation of the Methods of Production.’ Archueometry 25, 1, pp.17-27. Printed in Great Britain British Museum, London
Tite, M. S. & Bimson, M. 1989 ‘Glazed Steatite: An Investigation of the Methods of Glazing Used in Ancient Egypt ‘ World Archaeology, Vol. 21, No. 1, Taylor & Francis, Ltd. pp. 87-100.
Tite,M.S, Shortland,A, Maniatis, Y, Kavoussanaki, D. & Harris,S.A, 2006, ‘The composition of the soda-rich and mixed alkali plant ashes used in the production of glass.’ Journal of Archaeological Science, Vol.33 pp. 1284-1292
Vandiver, Pamela, and Kingery, W. David,1987 ‘Manufacture of an Eighteenth Dynasty Egyptian faience chalice.’ In Bimson. Mavis & Freestone. Ian, (ed.) Early vitreous materials, BritishMuseum Occasional Paper 56, , pp. 79 – 90. London: British Museum.
WEBSITES
Davis Arts 2012 Blue Lotus Chalice, from Abydos Davis Publications Inc,
http://www.davisart.com/Portal/Fine-Art-Digital-Images/Blue-Lotus-Chalice/from-Abydos-Tomb-D115-125916.aspx viewed 23/4/2012.
Dictionary.com, 2012, http://dictionary.reference.com/browse/dextrin, Viewed 12/2/2012
LECTURE
Eccleston, M, 2011. – The making of Tutankhamun’s Treasures, Lecture, Melbourne Museum,Tuesday 6 September 2011
 By
By 